This article focuses on the “Highlighting” feature of Weava, and is part of the 4-series onboarding guide to help you make the most out of Weava. To learn more about the other important features offered by us, please check out the following articles!
- Highlighting (this article)
- Annotating
- Organizing
- Collaborating
Highlighting is at the heart of Weava (it’s the “highlight” of Weava!). It’s the core activity which everything else is connected to.
You may have been used to highlighting physical textbooks and articles, but there really haven’t been any similar digital equivalent that makes it easy for you to highlight all types of digital content. While you may be familiar with highlighting text on word documents, Weava offers more and greater convenience by allowing you to highlight directly on websites and PDFs that you visit. Other than websites and online PDFs, you can also highlight local PDFs on your computer and uploaded PDFs to Weava. All your highlights are saved on Weava and syncs to the cloud so that you can access them from anywhere.
Now, how can I highlight?
It is simple. You highlight by dragging your mouse and selecting text on the webpage, then the Weava highlighter pop-up shows up, where you can select the color of your choice.

Alternatively, you can also highlight by right-clicking your selected text, then choosing the Weava, and then click “Highlight”.
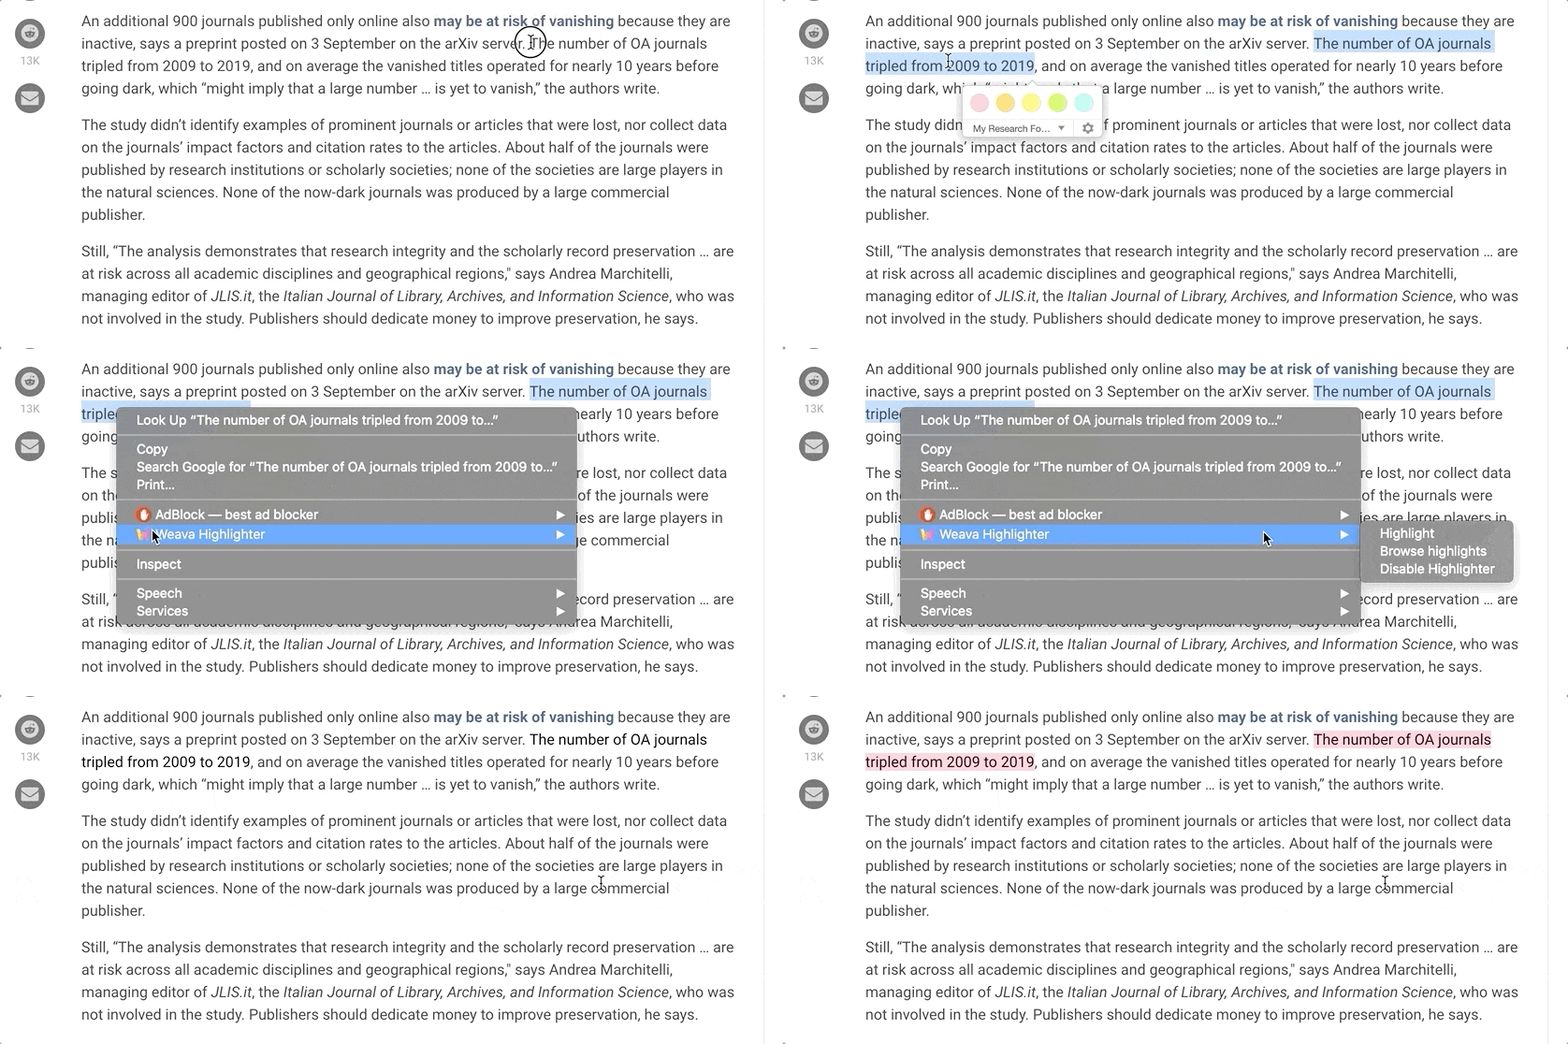
You can delete a highlight by simply clicking on the highlight you have made and then click the cross (x) icon on the color you had selected. You can also delete highlights in the Weava sidebar and dashboard – we talk more about this in our “Staying organized with Weava” article!

In cases where you do not want Weava to run, you can enable/disable the highlighter with “Alt+S” (for Windows) or “Option + S” (for Mac). Please also note that you can change the Weava keyboard shortcuts in your Chrome settings: chrome://extensions/shortcuts
How can I use the highlighter effectively?
The Weava highlighter can be used in various cases; such as highlighting difficult words you may want to look up later, highlighting quotes and materials for research or essay writing, or even highlighting words and using the note for translations when learning a language. A helpful way to make your researching process easier and more effective is to color-label your highlighters. For example, pink may indicate important parts or key information you find in the text; orange may be used to highlight confusing parts, while green may be used to highlight proof or evidence found. Or any color-labeling that makes sense to you!
With the free version of Weava, you are able to use and label the five default colors, while with Weava Premium you can customize any color you want (up to 10 unique colors per folder).
Where can I find my highlights?
All your highlights are saved in folder collections which you can access in the Weava sidebar (the Chrome extension) and on the Weava dashboard (the web application). When you make a highlight, the related information, such as website URL and other information is automatically saved and part of the citation you can then copy.
Another exciting feature that is offered to premium users is the ability to clip images. You will be able to save images on any websites by dragging them into a small box on the left side of the Chrome screen saying “Drop here!”. The images will be automatically saved in your active Weava folder, and you can access the images from your sidebar and dashboard.

Labelling your highlight colors
Just like how you would do so with real highlighters, it is especially helpful to color coordinate your highlights to make revision much easier. With Weava, you can label your highlight colors to further organize your highlights and notes. Simply click on the “Edit” button on a folder, and you will be able to name the color labels in the respective folder.

Highlight local files PDFs on your computer
With Weava, you can not only highlight online websites and online PDFs, you can also highlight PDFs that are located on your computer.
In order to do so, please make sure you have ticked the “Allow access to file URLs” box on your Chrome extension settings, as shown below.

You can then open PDFs from your computer with Google Chrome.

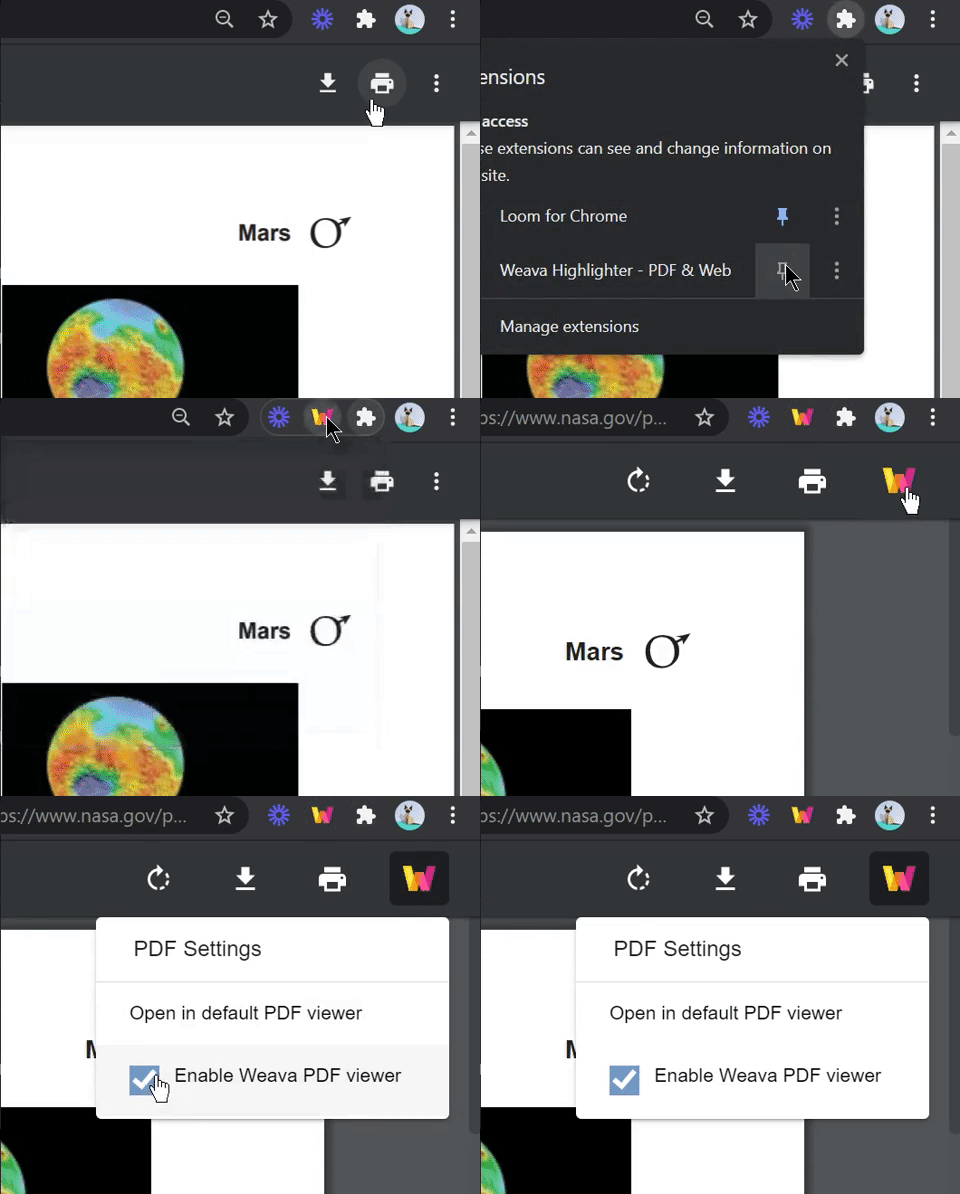
Then, on Google Chrome, click on the Weava (“W”) icon in your browser to open the PDF with Weava. To be able to open PDFs by default with Weava’s PDF viewer, click “W” inside the PDF menu settings in the top right corner of the PDF and tick the “Automatically load PDFs from Weava” box.
A small bonus tip!
Have you noticed that sometimes our highlighter box appears above the words while sometimes it appears at the bottom of the word? You can try to decide where the highlighter box appears by your way to highlight the words!
By dragging your mouse and selecting text on the webpage from right to left, the highlighter box will appear above of the words; by by dragging your mouse and selecting text on the webpage from left to right, the box will be appearing at the bottom of the words.


Weava highlighting disclaimer
At Weava, we are trying our best to constantly improve and provide the best highlighting experience for you. However, there are some limitations that should be taken into account when using the extension. Among others, we unfortunately currently do not support highlighting on Google Drive or Google Classroom files directly.
Please also note that, while Weava works on most websites, some websites have conflicting code that results in the Weava highlighter not functioning properly. Unfortunately, as this is related to those respective websites, and not to Weava, there is no direct immediate fix to this issue. However, as we always strive to improve, we are keeping a backlog of websites that Weava is known to have issues with – and hopefully one day we can ensure that Weava works smoothly on those websites too. Should you encounter such website, please report it to us here.
Lastly, Weava fetches and visually renders your color highlights based on the respective URL you first made the highlight on (for websites and online PDFs). Please note that, while your highlights and annotations are always saved in the Weava sidebar and on your Weava dashboard, if the website URL for some reason changes, then the visual rendering of your previous highlights are not visible unless you update the URL in the “Edit Source” functionality on the Weava dashboard. This is also why any type of dynamic URL pages, such as Google Search and URLs in email inboxes will struggle to visually show you the highlights, as these URLs can often change for several reasons. You can refer to our “Organizing” article regarding updating URLs (hyperlink) if you come across websites and local PDFs that have recently changed file paths
Up next
With a more solid understanding of Weava’s highlighter features, research is so much easier. To learn more about other Weava features, please consider checking the next article in the series about Weava’s note-taking capabilities.
